About
This is an informational web page for the Compiler Principles course
(NSWI098),
which is being taught at the Faculty of Mathematics and Physics,
Charles University.
The lectures in Czech are being held in S5 from 15:40
to 17:10 every Wednesday.
The seminars are in S5 from 17:20 to 18:50 according to schedule.
You can find here:
Warning for Erasmus students
This course is tough. All Erasmus students who tried this course failed. That is why this course is not offered for Erasmus.
English-language students from the Charles University
The lecture is not offered in English because the course is not a recommended part of any of the English-language programmes.
Nevertheless, as a support for adventurous students of the English programmes, all the materials for the course are
in English. In the history of the course, there were so far 2 English-language students who passed.
Contact
The course is currently led by
David Bednárek.
Grading
There is no exam for this course. The assessment is based solely on the home assignments.
Home Assignments
There will be 5 home assignments
which are designed to incrementally build a compiler for simplified C (called Cecko).
You may receive up to 100 points for the assignments 1 and 2,
150 points for the assignments 3 and 4, and 156 points for the assignment 5;
in total, 666 points.
The sum of your points will determine your final grade as follows:
| points | mark |
|---|
| 600 or more | 1 (excellent) |
| 450-599 | 2 (well done) |
| 350-449 | 3 (OK) |
| 349 or less | failed |
Solutions for the assignments are submitted into ReCodEx.
Each assignment is automatically checked against a set of tests
and awarded a specified amount of points for passing each test,
depending on the complexity.
In each assignment, 100 points are awarded for tests marked as base;
the additional points in assignments 3 to 5 are related to bonus tests.
Points for bonus tests are awarded only if at least 50 points (before late submission penalty)
are awarded for the base tests. This rule is implemented by manual adjustment by the teacher,
i.e. the cancellation of bonus points may happen some days after the automatic evaluation.
ReCodEx also automatically administers a penalty for late submission, proportional to the amount of points awarded
and linearly dependent on the delay. The amount of penalty is set up so that the resultant score will be degraded
to zero 10 days after the deadline for assignments 1 and 2, or 15 days for the assignments 3 to 5.
About two weeks after the deadline, the best solutions will be reviewed by the teacher
and score may be slightly revised up or down, based on the detailed test results
and, if needed, code inspection.
In particular, warnings issued by the C++-compiler are penalized,
except of those caused by the underlying technology (flex/bison/llvm).
Every few days, solutions are tested for plagiarism and suspected cases reported to the teacher.
Based on the assessment by the teacher, all significant cases of plagiarism
will lead to no credit for the course, for both active and passive participants.
Lectures
The dates below are only an approximation; actual timing will differ.
The contents of slides may be adjusted just before every lecture.
Assignments
Global assignment
The Cecko (simplified C) language is defined by a set of grammar rules.
You may find them in the file doc/selected-grammar.md in the skeleton repository.
The grammar is exactly in the same format as in the
C programming language specification (working draft) Annex A,
it is just simplified as Cecko is a subset of C.
Please note some further remarks:
-
The start nonterminal is "translation-unit".
-
There can be an arbitrary number of white space characters (CR, LF, SPACE, TAB) between the tokens as well as before the first one and after the last one.
-
Comments also count as a white space. They are discussed in detail in the first homework assignment.
-
All identifiers and keywords are case-sensitive.
Developing and testing
Read the Using your Cecko repository section before cloning the skeleton. The framework and skeleton files may be updated for various reasons, therefore, you will need a method to merge the updates into your project.
The skeleton framework contains the following folders:
- doc - documentation
- fmwk - framework, do not change the files here
- main - different main function for different homeworks, do not change the files here
- solution - this is your playground, update incrementally files as you need (however don't touch CMakeLists.txt)
- test - test files and expected results
You will need to prepare your building environment as described in Prerequisites.
Refer to Building and running Cecko for instructions on building and running the code.
Assignment 1
For the first assignment, you will submit the following files:
- calexer.lex - Flex source file for the lexical analyzer
- casem.hpp - C++ header file
- casem.cpp - C++ source file
You may use the C++ header/source files for C++ routines called from calexer.lex
- in this case, add #include "casem.hpp" to calexer.lex.
Assignments 2 to 5
For the last four assignments, you will submit the following files:
- calexer.lex - Flex source file for the lexical analyzer
- caparser.y - Bison source file for the parser and semantic actions
- casem.hpp - C++ header file
- casem.cpp - C++ source file
Test files
The Cecko source files have the usual suffix .c,
the corresponding expected outputs are in the .gold files.
The test files whose names end with "n" contain intentional semantic errors and are expected to fail during compilation.
Submitting and evaluation
You shall submit your solution into Recodex.
Note: For registering in Recodex, you need a working email address registered in CAS.
Recodex will compile it using GCC 12.2.
Your solution should not use any 3rd party libraries or code (except those specified in the section Building and running Cecko).
Only standard C++20 libraries should be used.
Recodex will compile your solution with the same library and will apply the same tests as in the framework.
(However, Recodex will use a different build system.)
Compilation and tests in Recodex takes some time - please be patient.
Recodex will insist on strict equivalence of your solution outputs to the gold files.
However, we will manually inspect results of all tests which can compile and run but fail in the Recodex judge phase.
Therefore, you may be assigned some points even if Recodex assigns zero.
Each home assignment has a maximal achievable points (100 points for assignments #1-#2, 150+ points for assignments #3-#5).
Any difference (including your debug messages) between your compiler output and a provided correct output is penalized.
The penalization depends on the severity of the problem.
(1) Lexical analysis
- Extend the
calexer.lex file so that the resulting scanner is capable of recognizing all the lexical elements described in doc/selected-grammar.md and returns the objects which represent them at the interface between the lexer and the parser.
- All objects representing tokens are created using a call to a function like
cecko::parser::make_WHILE(...) whose declarations are generated in <build-folder>/fmwk/ckdumper.hpp by the build system for cecko1. All these functions have a parameter location_type l, pass ctx->line() here.
- The list of token names (and additional parameter types) may be found in ckdumper.y (it has to be the same as in caparser.y which is not used when building
cecko1)
- Some tokens (like >,<,>,<=,>= or +,-) are grouped together. The object representing the token is shared across each group (it will become the same terminal in the grammar); individual tokens are distinguished using an additional parameter of the object (an enumeration type associated to the group, like
cecko::gt_cmpo::LT - see ckgrptokens.hpp).
- Identifiers and literals have an additional parameter of the object - the text or value - pass the value of the correct type here
- String literals shall not contain end-of-line (non-escaped \n). You will need 'start conditions' feature of FLEX to implement escape sequences. The effective value (with quotes removed and escapes replaced) shall be passed to
make_STRLIT as std::string (cecko::CIName is just an alias)
- Character literals shall not contain end-of-line (non-escaped \n) and they represent always only one char in Cecko. Remember, characters have type
int in C.
- Multiline comments are enclosed in
/* and */ (not inside a string or one-line comment). Comments can contain any sequence of any characters. Multi-line comments can be nested - starts (/*) and ends (*/) have to be paired correctly. You will certainly need 'start conditions' to handle this.
- One-line comments start with
// (not inside a string or multi-line comment) and end with end of the line. Comments can contain any sequence of any characters except the end-of-line. You will certainly need 'start conditions' to handle this.
- Call
ctx->incline() whenever you meet end-of-line - this increments ctx->line(). The first line has number 1 (ctx->line() is already initialized to 1). (You must not use %option yylineno to count lines.)
- Detection of and recovery from lexical errors, like end-of-line or end-of-file in the middle of a string (report
EOLINSTRCHR or EOFINSTRCHR and terminate the string as if the terminating quote was present), end-of-file in comment (EOFINCMT).
- Detection of malformed lexical elements, like
12xy or 0xcxy (it is not an INTLIT followed by an IDF). You shall report an error (BADINT), consume the whole malformed lexical element and produce one INTLIT token (with the value of 12) in this case.
- Detection of too large integer literals (larger than
MAX_INT=0x7FFFFFFF; Cecko behavior is slightly different from the standard here). You shall report an error (INTOUTRANGE) and produce the INTLIT token with a value of MAX_INT. (Beware: the atoi function has undefined behavior for integers greater than MAX_INT, you will need strtol or stoi or a hand-made implementation.)
- Detection of too large hexadecimal escape sequences in char and string literals (larger than 0xFF). You shall report an error (
BADESCAPE) and produce the INTLIT or STRLIT with \xFF substituted for the overflowed escape sequence.
- If, after a backslash, you encounter a character other than specified in
simple-escape-sequence, report the error (BADESCAPE), ignore the backslash and use the character after the backslash.
- Use code like
ctx->message(cecko::errors::EOFINCMT, ctx->line()) to signal an error. All error codes are declared in fmwk/ckcontext.hpp, the message texts are in fmwk/ckcontext.cpp. The err_def_s messages have an additional argument of type std::string_view
Example input (*.c) and outputs (*.gold) can be found in the tests directory.
(2) Parsing
- Rewrite the grammar in doc/selected-grammar.md to Bison rules in
caparser.y.
- The declarative part of the
caparser.y file is already prepared and you should not change it.
- Remove all shift/reduce and reduce/reduce conflicts.
Warning: bison does not report conflicts to stdout.
CMake projects instruct bison to report the conflicts in
<build_folder>/stud-sol/caparser.y.output, but you have to examine this file manually.
- Extend calexer.lex with
TYPEIDF token detection.
The lexical element identifier corresponds to two tokens IDF and TYPEIDF depending on the content of compiler tables.
Use if(ctx->is_typedef(yytext)) for detecting type identifier using compiler tables.
Specifically for this assignment, we have predefined FILE identifier as a type identifier.
(3) Declarations
Implement semantic analysis for declarations.
- 100 points:
- void, _Bool, char, int, TYPEIDF, const
- pointer and function declarators
- variable and function declarations and definitions
- return statement containing an INTLIT
- +10 points:
- +10 points:
- array declarators (with an INTLIT in brackets)
- +20 points:
- enum declarations and definitions
- +20 points:
- struct declarations and definitions
You will not be awarded any bonus points
if your solution receives less than 50 points
from the 100-point base part.
(4) Expressions
Implement semantic analysis for expressions.
- 100 points:
- Integer, character, and string literals
- Implicit conversions:
- Array to pointer (string literals are of type char[N])
- _Bool/char to int, int to char
- Function calls (including variadic functions like printf)
- Arguments and return values of types char/int/pointer
- int operators:
- Unary +, -
- Binary +, -, *, /, %
- Pointer operators:
- Assignment operator (into char/int/pointer L-values)
- Return statement
- +10 points:
- +10 points:
- int ++, --, +=, -=, *=, /=, %= operators
- pointer ++, --, +=, -= operators
- +20 points:
- [] operator
- Pointer+int, int+pointer, pointer-int operators
- +10 points:
- .,-> operators
- Assignment, function arguments and return values of type struct
You will not be awarded any bonus points
if your solution receives less than 50 points
from the 100-point base part.
(5) Control-flow statements
Implement semantic analysis for control-flow statements and Boolean expressions.
- 100 points:
- Implicit conversions:
- char/int/pointer to _Bool
- _Bool operations:
- Unary !
- Arguments and return values of type _Bool
- Assignment operator into _Bool
- int operators:
- if and if-else statements
- while and while-do statements
- +10 points:
- +10 points:
- pointer operators:
- ==,!=,<,>,<=,>=
- pointer-pointer
- +30 points:
- &&, || operators with shortcut evaluation
- +6 points:
- Complex mixture of the elements above
You will not be awarded any bonus points
if your solution receives less than 50 points
from the 100-point base part.
Prerequisites
Platform
Recodex uses Linux and GCC to compile and run your submissions. It may trigger errors which escaped detection in
other compile/run environments. For such cases, it is advantageous to have a GCC-based build environment
prepared beforehand.
On the other hand, the Cecko sources are intended to be multi-platform and the skeleton is regularly tested with
both GCC and Microsoft Visual C++. Therefore, development using MSVC is possible (and encouraged).
Windows Subsystem for Linux
For developers equipped with Windows 10, Windows
Subsystem for Linux (WSL) is recommended as the best approach to multi-platform development. Compiling,
running and debugging in the WSL-GCC environment is integrated in Visual Studio 2022 (as well as VS Code) and
fully supported by Cecko projects.
Note: If you plan to build LLVM on your own
(instead of downloading binaries), make sure that you use WSL 2 and that the working folder
is at native Linux filesystem (i.e. not /mnt/...).
Git
Make yourself familiar with the principles of git.
In Linux, you will probably use command-line git which is present in all modern Linux distributions.
In Windows, TortoiseGit is the recommended option.
You may also try using the Git plugins in Visual Studio 2022 or VS Code; however, be aware that some advanced
commands may not be available there.
To access gitlab.mff.cuni.cz, you will first need to login (using your
SIS credentials) in its web interface and register your SSH keys there (if you have not done so yet).
Build tools
cmake
CMake 3.19 or newer is required. It is packaged in sufficiently new distributions of
Linux (including Ubuntu 22.04 in WSL), installed by something like:
sudo apt install cmake
For Windows, cmake (and ninja) is installed with Visual Studio 2022 when C++ CMake tools
for Windows is enabled in the Visual Studio Installer. C++ CMake tools for Linux
is required when Visual Studio is used to build in WSL or remote Linux.
When using VS Code, cmake (as well as a C++ compiler) must be installed as an external tool.
ninja and zlib
If you use Visual Studio support for Linux, you may need to manually install ninja build system
like:
sudo apt install ninja-build
In some Linux distributions, you may encounter linker complaining about -lz. The
remedy is installing libz like:
sudo apt install zlib1g-dev
bison and flex
bison 3.4 and flex 2.6.4 or newer are required. They are present in any (sufficiently new)
distribution of Linux (including WSL), installed by something like:
sudo apt install bison flex
For Windows, they may be downloaded from lexxmark/winflexbison. Unpack the .zip to a
suitable location and add the folder to the Path variable using the Edit
the system environment variables control panel dialog. This package contains
win_bison.exe and win_flex.exe - these names are recognized by cmake.
If you are unable to install bison/flex into system folders or if cmake does not find (the correct version of)
bison or flex, you may specify it explicitly when invoking cmake:
cmake -DBISON_ROOT=<bison_install_folder> -DFLEX_ROOT=<flex_install_folder> ...
Note that the bison executable must be located in <bison_install_folder>/bin etc.
Within Visual Studio, you may specify the BISON_ROOT and FLEX_ROOT in the CMake
Settings.
Note: You may also use the winflexbison3 package from Chocolatey.
Note: You cannot use WSL installations of bison/flex for MSVC builds (and vice versa) because cmake would not
invoke them properly. Therefore you will probably end with two bison/flex installations if you do both MSVC
and GCC builds, similarly to having two installations of cmake in this case.
C++20 compiler
MSVC 19.36 (part of Visual Studio 2022 v17.6) and gcc 11.4.0 are verified to be sufficient for the compilation of Cecko.
LLVM
Cecko uses the intermediate code (IR) and JIT x86 code generator (MCJIT) from the LLVM framework.
The required version is LLVM 15 or newer; the tests in Recodex run with LLVM 19.1.0.
Although the LLVM team recommends building LLVM from
sources, it may be well beyond the capability and patience of most Cecko developers. Therefore, downloading a
binary version is recommended.
Note: Cecko requires only headers and static libraries; however, all binary distributions of LLVM include
also many executables and dynamic libraries. Some downloads/packages include only the executables which is
insufficient for Cecko. This also applies to some downloads at LLVM Pre-Built Binaries
Linux (including Ubuntu 22.04 in WSL) - using system-wide
installation
The simplest way to install the required LLVM modules is from a Linux distribution channel, like:
sudo apt install llvm-15
cmake will automatically find LLVM if installed in this way.
Note: Although these libraries are compatible with Debug mode, they do not contain full debug info, for
example, stepping into LLVM procedures during debugging of Cecko may be impossible.
Linux - installing and using private LLVM copy
Pre-built LLVM 19.1.0 binaries for Cecko are available here:
Note: These are the same binaries as used in Recodex, compiled with g++ 13.2.0
When building Cecko with a private LLVM installation, cmake must be instructed to find
LLVM by setting the LLVM_DIR cmake variable to the value
<llvm-install-folder>/lib/cmake/llvm as follows:
cmake -DLLVM_DIR=<llvm-install-folder>/lib/cmake/llvm <...other-arguments...>
Windows binaries
Beware: The Windows versions of Pre-Built Binaries published by LLVM (as of October 2023) are
not complete enough for Cecko.
Beware: vcpkg can now install LLVM; however, the installation is implemented by building from sources and may take several hours.
Pre-built LLVM binaries for Cecko are available here:
Note: The above binaries are compatible with Visual Studio 2022 v17.2.0 (May 2022) or newer.
When building Cecko, cmake must be instructed to find LLVM by setting the LLVM_DIR
cmake variable to the value <llvm-install-folder>/lib/cmake/llvm.
In Visual Studio 2022, the LLVM_DIR variable is set in the CMake variables and
cache section of the CMake Settings (CMakeSettings.json); you may run
Generate Cache to pre-create this variable before setting it to the correct value.
In VS Code, the LLVM_DIR variable is located in the cmake.configureSettings entry of
.vscode/settings.json.
When cmake is invoked from command-line, it may look like:
cmake -GNinja -DLLVM_DIR=<llvm-install-folder>/lib/cmake/llvm <...other-arguments...>
Note: Make sure you use ninja (-GNinja) as the cmake Generator.
Modern versions of cmake for Windows generate Visual Studio projects by default
and some commands described in this guide do not work correctly in this mode.
If cmake is invoked by Visual Studio, Ninja is enforced by default.
Note: If you compile with Microsoft Visual C++ from command-line, make sure that the x64 version
of cl is visible when cmake is invoked
(e.g. by starting from the "x64 Native Tools Command Prompt for VS 2022").
The cecko system is incompatible with 32-bit x86 mode which could be the default elsewhere.
Building LLVM (advanced)
If you decide to ignore binary distributions and build LLVM on your own (beware, it may require several hours of
downloading and building), the simplest approach is cloning llvm-project into a
<llvm-project-folder>:
git clone https://github.com/llvm/llvm-project.git <llvm-project-folder>
If you want to have exactly the same version as in recodex, checkout the tag llvmorg-17.0.1.
To build and install, create a <llvm-build-folder> and a
<llvm-install-folder>, then configure, build and install using:
cd <llvm-build-folder>
cmake -GNinja -DLLVM_PARALLEL_COMPILE_JOBS=8 -DLLVM_PARALLEL_LINK_JOBS=1 \
  -DLLVM_TARGETS_TO_BUILD=X86 -DCMAKE_BUILD_TYPE=Debug \
  -DCMAKE_INSTALL_PREFIX=<llvm-install-folder> \
  <llvm-project-folder>/llvm
cmake --build .
cmake --install .
When building Cecko with the home-built LLVM, define the LLVM_DIR variable as
<llvm-install-folder>/lib/cmake/llvm.
See also Building LLVM with CMake.
Using your Cecko repository
For each student registered for this course, a repository was created in gitlab.mff.cuni.cz/teaching/nswi098/2023.
If you cannot see your repository there, it is probably because your login was not registered in gitlab when
the repository was created. Ask your teachers in this case.
Your remote repository shall remain private even after your work is finished and points awarded,
otherwise you may be deemed guilty if a plagiarism case appears.
You shall clone your repository to a local folder as usual:
git clone <your-repository-url> <local-folder>
Each repository was already initialized by a copy of the skeleton. However, it will not automatically import any
changes made to the skeleton after the creation.
Changes to Cecko in 2023/24 wrt. 2022/23
Cecko has moved from LLVM 14 to LLVM 17; it remains compatible with LLVM 15 and 16.
Solutions developed with LLVM 14 and older require minor reengineering - see Opaque Pointers.
Merging updates of the
skeleton into your code
The actions described in this section will be needed if there is an update (by the teachers)
to the skeleton repository after the creation of the students' repositories.
There is no planned update in sight at this moment.
You may probably safely ignore the actions described below until the moment when skeleton update
is really needed (due to a bug or incompatibility with some build environment).
Configuration
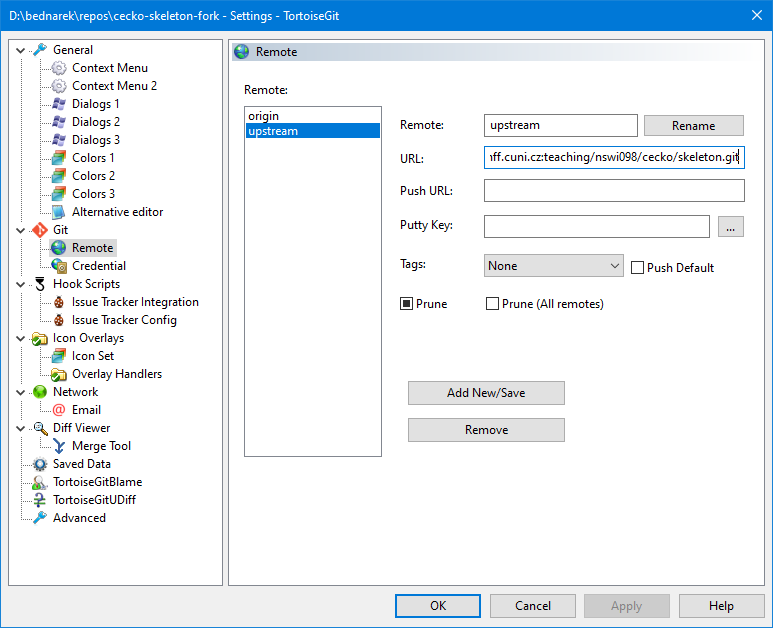
At each local folder you use, you need to setup the upstream remote:
git remote add upstream git@gitlab.mff.cuni.cz:teaching/nswi098/cecko/skeleton.git
In TortoiseGit, the remote is created in the config accessible from the Git Sync… dialog through
the Manage button. The resulting config shall look like this:
Merging
Whenever you think the skeleton repository may have been updated, execute a pull from upstream:
git pull upstream master
In TortoiseGit, the Pull command may be executed from the Git Sync… dialog after
selecting the upstream remote as shown here:

If you encounter conflicts on an upstream pull, it probably means that you added your code to an unexpected
place in the skeleton files. Try to resolve it carefully, if in doubts, ask your teachers.
Your work shall be pushed to/pulled from the default origin remote.
Building and running Cecko
Building
Command-line
Create a <build-folder>, by convention as <cecko-folder>/build. Then
configure using these commands:
cd <build-folder>
cmake -DCMAKE_BUILD_TYPE=Debug -DLLVM_DIR=<llvm-install-folder>/lib/cmake/llvm <cecko-folder>
The -DLLVM_DIR option is usually not required if LLVM was installed as a system package.
Building is then done by invoking cmake --build . or make in
<build-folder>.
The resulting executables are located in <build-folder>/stud-main and invoked like:
cd <build-folder>
<build-folder>/stud-main/cecko1 <cecko-folder>/test/test1.c
Visual Studio 2022
Open the <cecko-folder> with Visual Studio.
When opened for the first time, use PROJECT/CMake Settings to adjust the cmake
configuration, the LLVM_DIR variable in particular (see Prerequisites). The default
x64-Debug configuration is created automatically; to use WSL, add the
WSL-GCC-Debug configuration, adjust it if necessary and switch to it.
See also the related Visual Studio
Documentation.
Visual Studio Code
In Windows, install the Visual C++ compiler first. Then start an x64 Developer Command
Prompt (which defines the environment where the compiler is visible), then run
code from the command prompt. Then follow the documentation for the CMake
Tools extension.
Running
Command-line
The resulting executables are located in <build-folder>/stud-main and invoked like:
cd <build-folder>
<build-folder>/stud-main/cecko1 <cecko-folder>/test/test1.c
Visual Studio 2022
Open DEBUG -> Debug and Launch Settings for … (launch.vs.json) and add the following settings
into the x64 configuration(s) in use:
"currentDir": ".",
"args": [ "test\\test1.c" ]
For WSL configuration(s), use:
"cwd": ".",
"args": [ "test/test1.c" ]
For remote Linux configuration(s), adjust remoteCMakeListsRoot in CMakeSettings.json so that it
does not use the $HOME variable, then use:
"cwd": "${cmake.remoteCMakeListsRoot}",
"args": [ "test/test1.c" ]
Note that WSL and remote Linux use the same debug config ("type": "cppgdb");
therefore, there is probably no setting that works simultaneously in both cases.
See also the related Visual
Studio Documentation.
Visual Studio Code
T.B.D.
Links
We have gathered several links to materials that are closely related to the subject.
If you detect broken links or you wish to share a good link with your fellow students,
please contact the teachers.
A free online textbook by Douglas Thain
Douglas Thain: Introduction to Compilers and Language Design,
2nd edition, 2020, ISBN 979-8-655-18026-0
The Dragon Book
Alfred V. Aho, Monica S. Lam, Ravi Sethi, Jeffrey D. Ullman: Compilers: Principles, Techniques, and Tools (2nd Edition),
Addison Wesley, 2006, ISBN 978-0321486813
Manuals for the tools
Recordings of lectures